Wing Fractures
The ability to identify and address wing fractures is a necessity for all avian rehabilitators. Even if you are fortunate enough to have a veterinarian readily available to treat all your birds, you should still be familiar with wing wraps in order to stabilize fractures prior to treatment. An understanding of avian anatomy is critical. For a quick overview, visit Avian Skeleton
Necessary Steps
- Locating the fracture (affected bone)
- Identifying the type of fracture (simple or multifragmentary)
- Determing the type of wing wrap (figure 8, body wrap, flight wrap)
- Wrapping the wing
- Ensuring correct alignment
- Healing time
Identifying and Isolating the Fracture
Without x-rays, manually comparing every section of bone in the affected wing against those in the unaffected wing is the only other means of isolating a fracture. In some cases, a fracture can be hidden by tissue damage or swelling. In these cases a fracture should be assumed.
Fractures
Once the fracture is located, the type of fracture should be determined.
- Simple Fractures (click here for some classifications of simple fractures)
Special Considerations:
- Coracoid Fractures
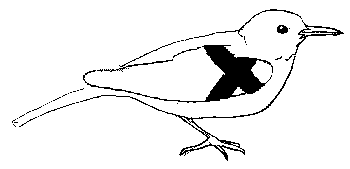
(stout, pillar-like bone anchoring sternum to rest of pectoral girdle – braces girdle against downward pull from flight muscles 1)This fracture can usually be identified by a noticeable shift of the wing towards the abdomen.
We utilize body wraps to provide support to the supracoracoideus muscle 2 in hopes of aiding alignment of the coracoid. However, many rehabbers have reported success without wrapping.
- Bone Reduction
 Reduction (the alignment of bones) is necessary when bones are no longer lining up properly. This can occur in older simple fractures ( > 2 days) and often in multifragmentary fractures.
The bones must be aligned prior to wrapping. In many cases, proper wing alignment will correct bone alignment. In extreme cases, bones begin to overlap. Correction should be performed by an experienced professional.
- Joint Fractures
In the case of fractures in or near joints, wraps should be frequently replaced and gradually become less restrictive to prevent joint “freezing”. - Complex, exposed fractures and any injuries sustained from cats should be evaluated for antibiotic therapy.
Wrapping The Wing
Two key elements (fracture location and type of fracture) are necessary in determining what type of wrap to use. In wild birds, it is important to use the type of wrap that:
- is the least restrictive to the bird
- provides the most support by immobilizing the affected bone and muscles
- does not use the affected bones for support (i.e. tight figure 8 wraps may cause bone misalignment in multifragmentary humerus fractures)
Types Of Wraps
Here is a very general guide on wrap types and their application. No two fractures are alike, so modification to achieve alignment may be necessary. Co-Flex and Vet Wrap are self-adhering bandages and are preferred for wing wraps. Usually a 1/2 by 8 inch strip is needed for a songbird wing, 1-1/2 x 10 inch strip for small gulls and ducks.
Figure 8
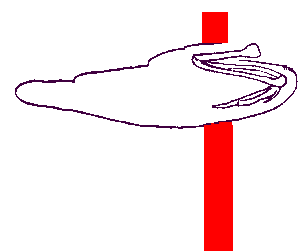
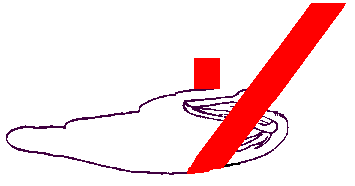
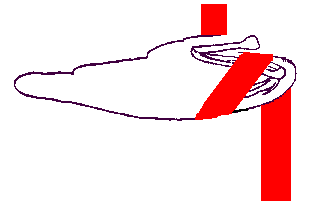
Begin under the wing behind the humerus. Bring the wrap up, over and under the radius/ulna. Complete the wrap by bringing it up and over the humerus.

Body Wrap
We utilize a modified body wrap to prevent the wrap from slipping. The figure 8 wrap is fixed into position by adhering to the body wrap, which runs under and over the figure 8 wrap. Beginning on the back, bring the wrap under the affected wing. The wrap continues across the abdomen and under the unaffected wing. The wrap overlaps on the back and is now brought over the top of the affected wing. The body wrap can be used without a figure 8 wrap in coracoid fractures and cases where extensive swelling has occurred. Ensure that the body wrap does not restrict respiration. 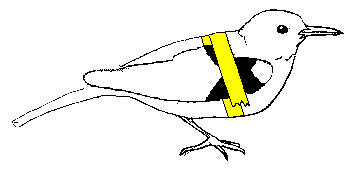
Flight Tape
We specifically use this wrap for low radius/ulna fractures, joint fractures, and wing tip (carpometacarpus) fractures. Begin by positioning medical tape under the wing at the point behind the humerus where the secondary and primary flight feathers extend. The tape is loosely brought around to the front again covering the secondary and primary flights. We do not use medical adhesive tape for any other wing wraps to avoid damaging the feathers. Micropore tape works well on smaller birds.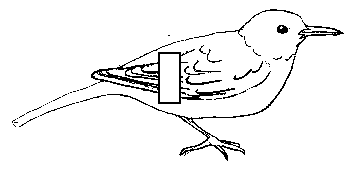
Unusual Circumstances
Fractures in extremely small birds can not be properly addressed with bandaging because proper alignment would be lost due to the bulky wrap. In the case of hatchlings, hummingbirds and other small birds, it is best to “fix” the wing into proper position with the use of super glue. Skin-to-skin contact is necessary, so feathers at the contact point will need to be to be removed. Carefully check alignment (see below) several times prior to administering super glue. Anticipate re-administering the glue every three days.
Ensuring Correct Alignment
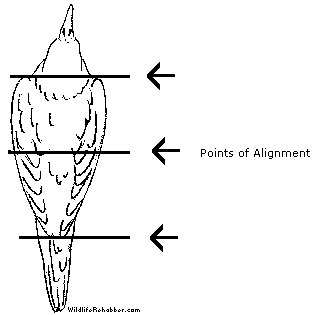
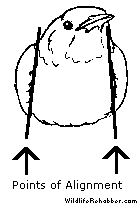
Once the fracture has been immobilized and the wing wrapped, the final check in evaluating the correction is by visually examining wing positioning and alignment in comparison to the unaffected wing. All the checkpoints of the wrapped wing (see the 2 photos below) should match the identical points on the unaffected wing. In the event that tissue swelling is causing misalignment, the wrap should be replaced and the wing re-aligned as soon as swelling has subsided.
Healing Time
Obviously, the time alloted for healing should be based on the severity of the fracture. Avian fractures begin to heal rapidly, but wraps should remain in place to provide continued support until healing is complete. Generally, 2+ weeks for simple fractures and 3-6 weeks for multifragmentary fractures.
References
1 https://web.utk.edu/~buehler/birds/jan20.html
2 https://numbat.murdoch.edu.au/Anatomy/avian/shoulderl.GIF
